

前言
在学会基本运用springboot同时,想必搭过ssh、ssm等开发框架的小伙伴都有疑惑,springboot在spring的基础上做了些什么,使得使用springboot搭建开发框架能如此简单,便捷,快速。本系列文章记录网罗博客、分析源码、结合微薄经验后的总结,以便日后翻阅自省。
正文
使用springboot时,首先引人注意的便是其启动方式,我们熟知的web项目都是需要部署到服务容器上,例如tomcat、weblogic、widefly(以前叫jboss),然后启动web容器真正运行我们的系统。而springboot搭建的系统却是运行***application.class中的main方法启动。这是为什么?
原因是springboot除了高度集成封装了spring一系列框架之外,还封装了web容器,springboot启动时会根据配置启动相应的上下文环境,查看embeddedservletcontainerautoconfiguration源码可知(这里springboot启动过程会单独总结分析),如下。
|
1
2
3
4
5
6
7
8
9
10
11
12
13
14
15
16
17
18
19
20
21
22
23
24
25
26
27
28
29
30
31
32
33
34
35
36
37
38
39
40
41
42
43
44
45
46
47
48
49
50
|
@autoconfigureorder(-2147483648)
@configuration
@conditionalonwebapplication
@import({embeddedservletcontainerautoconfiguration.beanpostprocessorsregistrar.class})
public class embeddedservletcontainerautoconfiguration {
...
...(中间省略部分)
@configuration
@conditionalonclass({servlet.class, undertow.class, sslclientauthmode.class})//undertow配置判断
@conditionalonmissingbean(
value = {embeddedservletcontainerfactory.class},
search = searchstrategy.current
)
public static class embeddedundertow {
public embeddedundertow() {
}
@bean
public undertowembeddedservletcontainerfactory undertowembeddedservletcontainerfactory() {
return new undertowembeddedservletcontainerfactory();
}
}
@configuration
@conditionalonclass({servlet.class, server.class, loader.class, webappcontext.class})//jetty配置判断
@conditionalonmissingbean(
value = {embeddedservletcontainerfactory.class},
search = searchstrategy.current
)
public static class embeddedjetty {
public embeddedjetty() {
}
@bean
public jettyembeddedservletcontainerfactory jettyembeddedservletcontainerfactory() {
return new jettyembeddedservletcontainerfactory();
}
}
@configuration
@conditionalonclass({servlet.class, tomcat.class})//tomcat配置判断,默认为tomcat
@conditionalonmissingbean(
value = {embeddedservletcontainerfactory.class},
search = searchstrategy.current
)
public static class embeddedtomcat {
public embeddedtomcat() {
}
@bean
public tomcatembeddedservletcontainerfactory tomcatembeddedservletcontainerfactory() {
return new tomcatembeddedservletcontainerfactory();
}
}
}
|
该自动配置类表明springboot支持封装tomcat、jetty和undertow三种web容器,查看spring-boot-starter-web的pom.xml(如下),其默认配置为tomcat。
|
1
2
3
4
5
6
7
8
9
10
11
12
13
14
15
16
17
18
19
20
21
22
23
24
25
26
27
28
29
30
31
|
<?xml version="1.0" encoding="utf-8"?>
<project xmlns="http://maven.apache.org/pom/4.0.0" xmlns:xsi="http://www.w3.org/2001/xmlschema-instance" xsi:schemalocation="http://maven.apache.org/pom/4.0.0 http://maven.apache.org/xsd/maven-4.0.0.xsd">
<modelversion>4.0.0</modelversion>
<parent>
<groupid>org.springframework.boot</groupid>
<artifactid>spring-boot-starters</artifactid>
<version>1.5.8.release</version>
</parent>
<artifactid>spring-boot-starter-web</artifactid>
<name>spring boot web starter</name>
<description>starter for building web, including restful, applications using spring
mvc. uses tomcat as the default embedded container</description>
<url>http://projects.spring.io/spring-boot/</url>
<organization>
<name>pivotal software, inc.</name>
<url>http://www.spring.io</url>
</organization>
<properties>
<main.basedir>${basedir}/../..</main.basedir>
</properties>
<dependencies>
<dependency>
<groupid>org.springframework.boot</groupid>
<artifactid>spring-boot-starter</artifactid>
</dependency>
<dependency>
<groupid>org.springframework.boot</groupid>
<artifactid>spring-boot-starter-tomcat</artifactid>
</dependency>
...
...
|
若我们使用其他容器,该如何配置,例如该篇文章Tomcat vs. Jetty vs. Undertow: Comparison of Spring Boot Embedded Servlet Containers详细比较了springboot中三种容器的性能、稳定性等,结果证明了undertow在性能和内存使用上是最好的。
显然,更换内置容器,能提高springboot项目的性能,由于springboot插拔式的模块设计,配置undertow只需要两步,如下。
1.第一步,去除原容器依赖,加入undertow依赖。
|
1
2
3
4
5
6
7
8
9
10
11
12
13
14
|
<dependency>
<groupid>org.springframework.boot</groupid>
<artifactid>spring-boot-starter-web</artifactid>
<exclusions>
<exclusion>
<groupid>org.springframework.boot</groupid>
<artifactid>spring-boot-starter-tomcat</artifactid>
</exclusion>
</exclusions>
</dependency>
<dependency>
<groupid>org.springframework.boot</groupid>
<artifactid>spring-boot-starter-undertow</artifactid>
</dependency>
|
2.第二步,在application.yml中配置undertow。
|
1
2
3
4
5
6
7
8
9
10
11
12
|
server.undertow.accesslog.dir= # undertow access log directory.
server.undertow.accesslog.enabled=false # enable access log.
server.undertow.accesslog.pattern=common # format pattern for access logs.
server.undertow.accesslog.prefix=access_log. # log file name prefix.
server.undertow.accesslog.rotate=true # enable access log rotation.
server.undertow.accesslog.suffix=log # log file name suffix.
server.undertow.buffer-size= # size of each buffer in bytes.
server.undertow.buffers-per-region= # number of buffer per region.
server.undertow.direct-buffers= # allocate buffers outside the java heap.
server.undertow.io-threads= # number of i/o threads to create for the worker.
server.undertow.max-http-post-size=0 # maximum size in bytes of the http post content.
server.undertow.worker-threads= # number of worker threads.
|
其余对容器的更多配置,调优等等不作介绍,可以自行百度undertow。
到这里,肯定会有很多人有疑惑,非得用springboot集成的容器作为运行环境吗?答案是:no! springboot同样提供了像往常一样打war包部署的解决方案。
1.将项目的启动类application.java继承springbootservletinitializer并重写configure方法。
|
1
2
3
4
5
6
7
8
9
10
|
@springbootapplication
public class application extends springbootservletinitializer {
@override
protected springapplicationbuilder configure(springapplicationbuilder application) {
return application.sources(application.class);
}
public static void main(string[] args) throws exception {
springapplication.run(application.class, args);
}
}
|
2.在pom.xml文件中,< project >标签下面添加war包支持的< package >标签,或者将原标签值jar改成war。
|
1
|
<packaging>war</packaging>
|
3.在pom.xml文件中,去除tomcat依赖,或者将其标记为provided(打包时排除),provided方式有一点好处是调试是可以用内置tomcat。
|
1
2
3
4
5
|
<dependency>
<groupid>org.springframework.boot</groupid>
<artifactid>spring-boot-starter-tomcat</artifactid>
<scope>provided</scope>
</dependency>
|
至此,以上3个配置便可以完成war方式部署,注意war包部署后访问时需要加上项目名称。
传统应用容器:
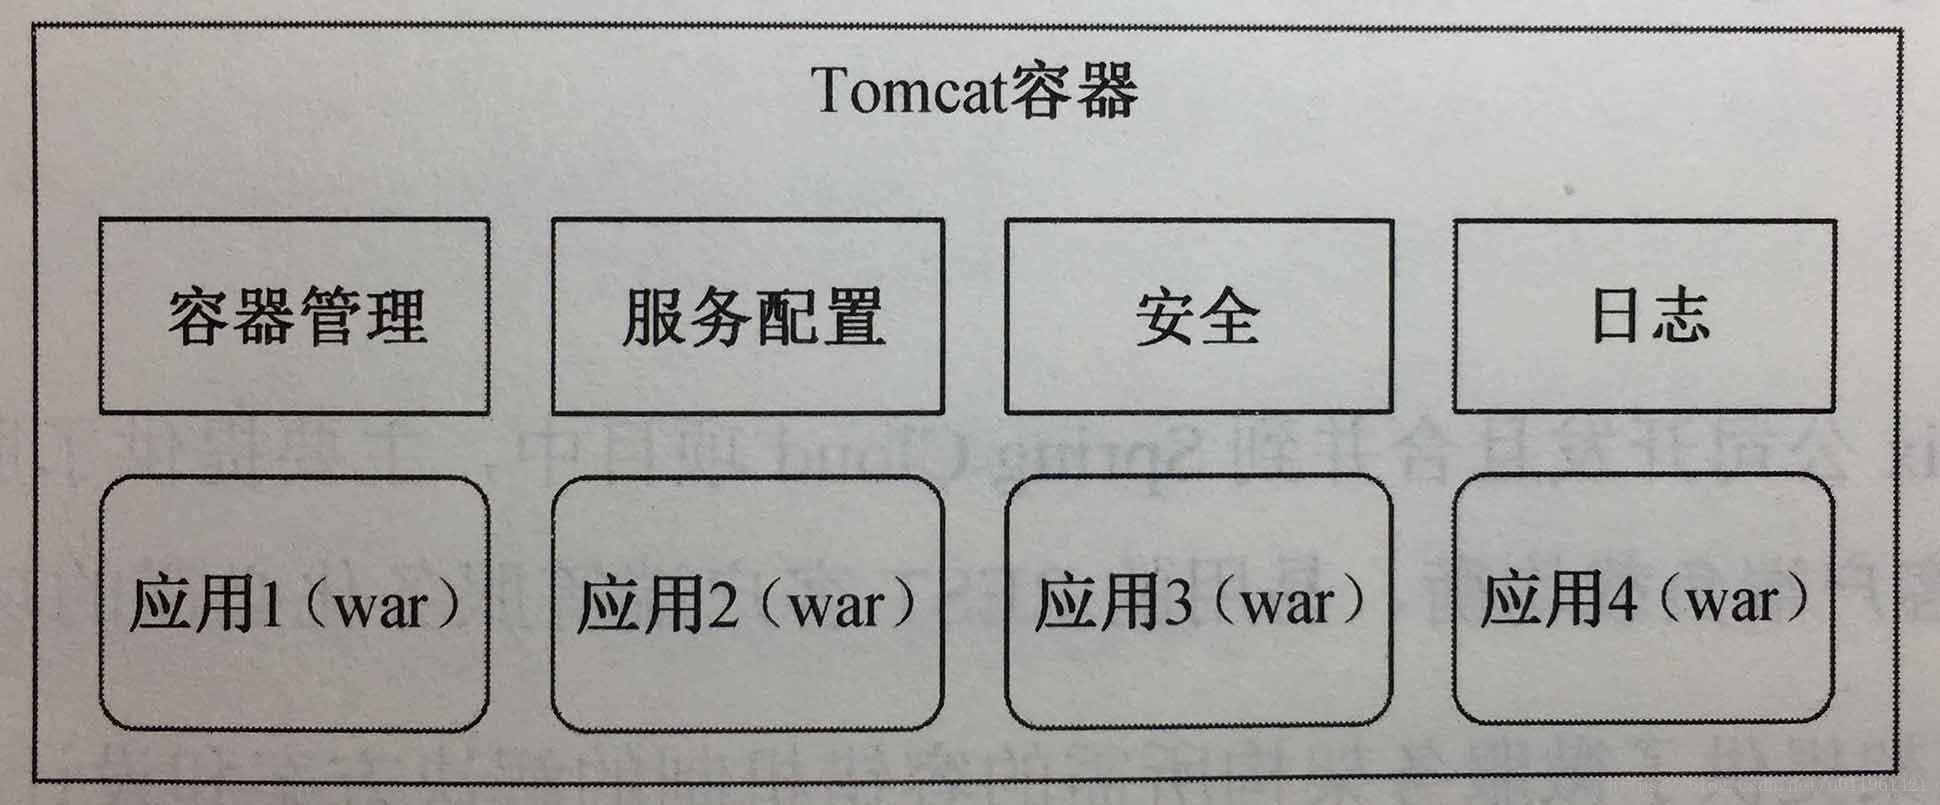
springboot容器:
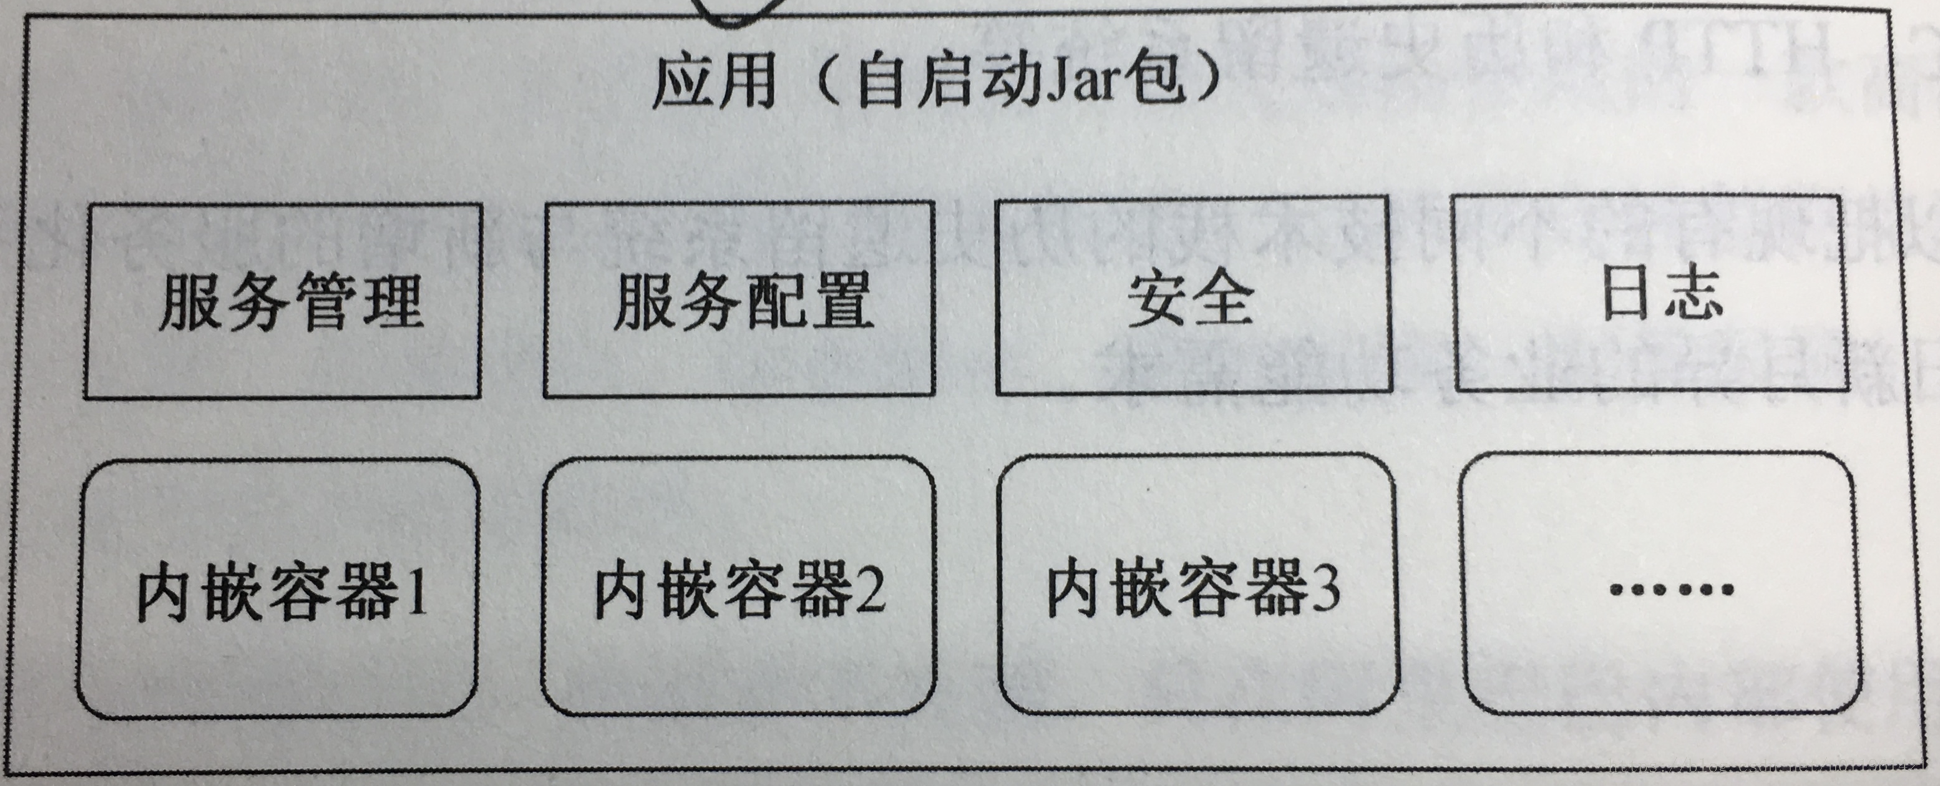
springboot这种设计在微服务架构下有明显的优点:
- 可以创建独立、自启动的应用容器
- 不需要构建war包并发布到容器中,构建和维护war包、容器的配置和管理也是需要成本和精力的
- 通过maven的定制化标签,可以快速创建springboot的应用程序
- 可以最大化地自动化配置spring,而不需要人工配置各项参数
- 提供了产品化特点,例如:性能分析、健康检查和外部化配置
- 全程没有xml配置,也不需要代码生成
总结
以上就是这篇文章的全部内容了,希望本文的内容对大家的学习或者工作具有一定的参考学习价值,谢谢大家对快网idc的支持。如果你想了解更多相关内容请查看下面相关链接
原文链接:https://blog.csdn.net/u011961421/article/details/79732924

相关文章


- ASP.NET本地开发时常见的配置错误及解决方法? 2025-06-10
- ASP.NET自助建站系统的数据库备份与恢复操作指南 2025-06-10
- 个人网站服务器域名解析设置指南:从购买到绑定全流程 2025-06-10
- 个人网站搭建:如何挑选具有弹性扩展能力的服务器? 2025-06-10
- 个人服务器网站搭建:如何选择适合自己的建站程序或框架? 2025-06-10


