介绍
微服务横行的互联网世界, 跨服务调用显得很平凡, 我们除了采用传统的http方式接口调用, 有没有更为优雅方便的方法呢?
答案是肯定的,feign就提供了轻便的方式!
如果你的服务都注册了注册中心,比如nacos, 那么调用会显得很轻松, 只需一个注解, 带上需要调用的服务名即可,**feign + nacos**会帮你做剩余的事.
如果没有注册中心, 也无需担心, feign一样可以以传统的
ip:port
方式进行调用~
下面,我们来实践下吧
springboot整合feign
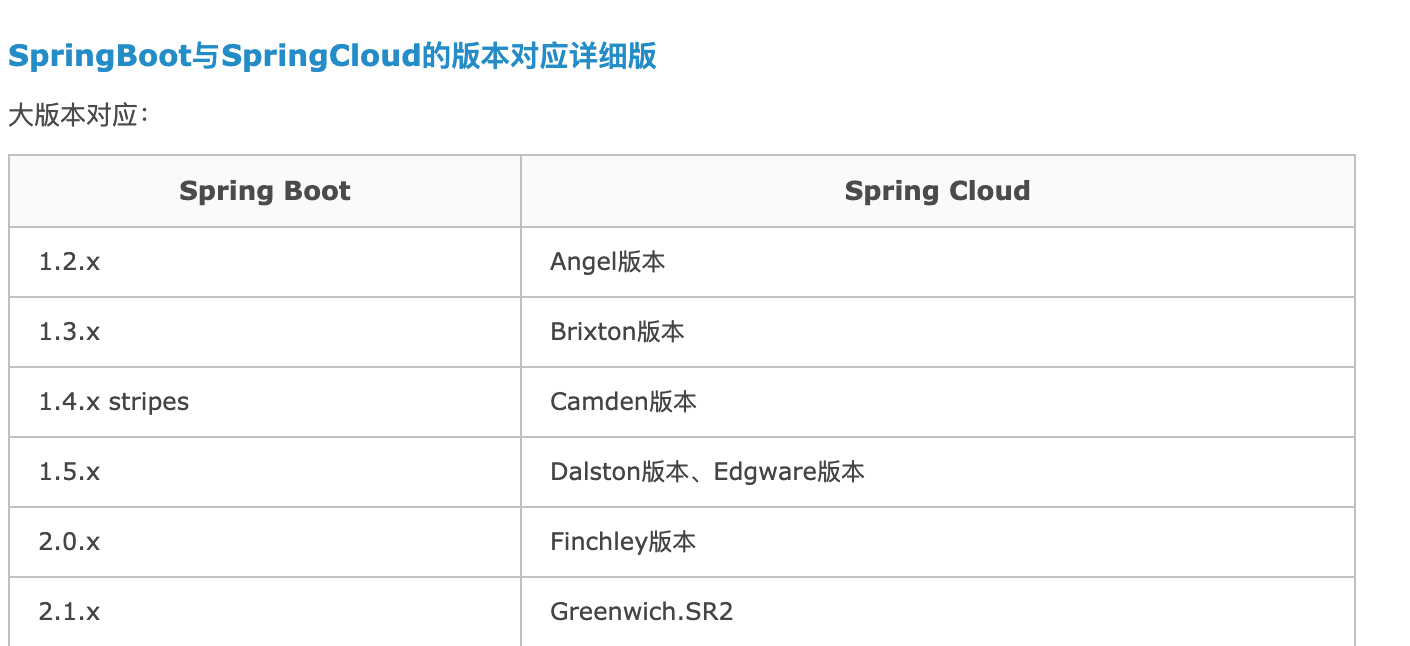
引入依赖, 这里注意, spring-cloud.version记得要和spring-boot版本匹配, 我这里spring-boot版本是2.1.3, 所以spring-cloud选择Greenwich.SR2版本.
大致的版本对应关系如下
更详细的请去https://start.spring.io/actuator/info
查询!
- <properties>
- <spring-cloud.version>Greenwich.SR2</spring-cloud.version>
- </properties>
- <dependencyManagement>
- <dependencies>
- <!–SpringCloud依赖 –>
- <dependency>
- <groupId>org.springframework.cloud</groupId>
- <artifactId>spring-cloud-dependencies</artifactId>
- <version>${spring-cloud.version}</version>
- <type>pom</type>
- <scope>import</scope>
- </dependency>
- </dependencies>
- </dependencyManagement>
- <dependencies>
- <!–openfeign跨服务调用–>
- <dependency>
- <groupId>org.springframework.cloud</groupId>
- <artifactId>spring-cloud-starter-openfeign</artifactId>
- </dependency>
- <!–openfeign底层使用ApacheHttpClient调用–>
- <dependency>
- <groupId>io.github.openfeign</groupId>
- <artifactId>feign-httpclient</artifactId>
- </dependency>
- </dependencies>
然后我们去项目的启动类上加上注解
@EnableFeignClients

最后, 加上Feign的配置
application.properties
- server.port=9999
- #******************openfeign配置,参数采用的是默认的配置,可根据实际情况调整***********************
- #启用ApacheHttpClient。默认就是true,使用HttpClientConnectionManager管理连接复用
- feign.httpclient.enabled=true
- #连接池的最大连接数,默认200
- feign.httpclient.max–connections=200
- #每个路由(服务器)分配的组最大连接数,默认50
- feign.httpclient.max–connections–per–route=50
- #连接最大存活时间,默认900秒
- feign.httpclient.time–to–live=900
- #连接最大存活时间单位秒
- feign.httpclient.time–to–live–unit=seconds
- #FeignAcceptGzipEncodingInterceptor拦截器被激活,会在header中添加Accept-Encoding:gzip,deflate,表明服务端在返回值时可以使用如下两个方式压缩返回结果
- feign.compression.response.enabled=true
- #FeignContentGzipEncodingInterceptor拦截器被激活,会在header中添加Content-Encoding:gzip,deflate,表明body中的参数是使用这两个方式的压缩
- feign.compression.request.enabled=true
- #content-length大于2048就进行请求参数的gzip压缩
- feign.compression.request.minRequestSize=2048
- #开启断路器
- feign.hystrix.enabled=true
- #断路器的隔离策略,默认就是线程池,SEMAPHORE模式下,就是主线程调用的远程的服务,即同步的
- hystrix.command.default.execution.isolation.strategy=THREAD
- #断路器超时设置
- hystrix.command.default.execution.timeout.enabled=true
- #总体请求在45秒还是无法得到响应,建议触发熔断(ribbon每个请求读取15秒超时,两个实例重试就是30秒,openfeign外层默认会进行一次调用,4次重试)
- hystrix.command.default.execution.isolation.thread.timeoutInMilliseconds=45000
- #断路器的线程池存在一个问题,在队列满了以后,不会再去创建新的线程直到maximumSize
- #核心线程池大小
- hystrix.threadpool.default.coreSize=10
- #最大线程池大小
- hystrix.threadpool.default.maximumSize=10
- #超过这个空闲时间,多于coreSize数量的线程会被回收,1分钟
- hystrix.threadpool.default.keepAliveTimeMinutes=1
- #队列的大小,默认为-1,即没有队列
- hystrix.threadpool.default.maxQueueSize=200
- #队列任务达到此阈值后,就开始拒绝;实际使用此参数进行队列是否满的判断
- hystrix.threadpool.default.queueSizeRejectionThreshold=180
- #负载均衡配置
- #读取超时15秒,与原RestTemplate保持一致
- ribbon.ReadTimeout=15000
- #连接超时15秒,与原RestTemplate保持一致
- ribbon.ConnectTimeout=15000
- ##每台服务器最多重试次数,但是首次调用不包括在内
- ribbon.MaxAutoRetries=0
- ##最多重试多少台服务器,与实际实例数保持一致(不包括首台)
- ribbon.MaxAutoRetriesNextServer=1
- #是否所有操作都重试,
- # false:get请求中,连接超时,读取超时都会重试,其他请求(put,post)连接超时重试,读取超时不重试。
- # true:get请求中,连接超时,读取超时都会重试,其他请求(put,post)连接超时重试,读取超时重试。
- #对于请求(put,post)要做好接口的幂等性
- ribbon.OkToRetryOnAllOperations=true
spring-boot整合feign完成, 接下来我们编写测试代码
测试代码
两个服务
- sb-alibaba-nacos (被调用方服务, 127.0.0.1:8081), 提供 getInfoById接口
- sb-feign (调用方服务, 127.0.0.1:9999), 提供 getInfoById 测试接口
sb-alibaba-nacos提供的测试接口
- @GetMapping(value = "getInfoById")
- public String getInfoById(@RequestParam(value = "id") Long Id) {
- return "example-service return :" + Id;
- }
sb-feign相关代码
我们新建个包 feign,用来放所有涉及跨服务调用的类
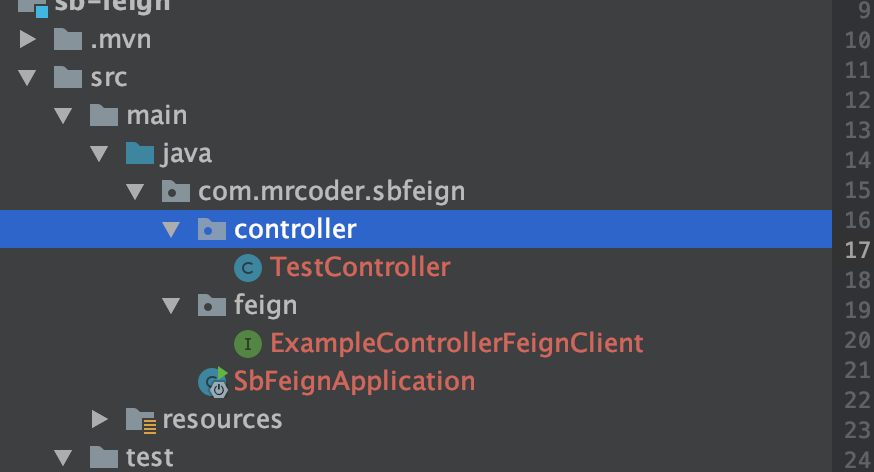
ExampleControllerFeignClient.java:
- package com.mrcoder.sbfeign.feign;
- import feign.hystrix.FallbackFactory;
- import org.slf4j.Logger;
- import org.slf4j.LoggerFactory;
- import org.springframework.cloud.openfeign.FeignClient;
- import org.springframework.stereotype.Component;
- import org.springframework.web.bind.annotation.GetMapping;
- import org.springframework.web.bind.annotation.RequestParam;
- @FeignClient(name = "sb-alibaba-nacos", url = "http://127.0.0.1:8081/", fallbackFactory = ExampleControllerFeignClient.ExampleControllerFeignClientFallbackFactory.class)
- public interface ExampleControllerFeignClient {
- @GetMapping(value = "getInfoById")
- String getInfoById(@RequestParam(value = "id") Long Id);
- /**
- * 服务降级内部类
- */
- @Component
- class ExampleControllerFeignClientFallbackFactory implements FallbackFactory<ExampleControllerFeignClient> {
- private Logger logger = LoggerFactory.getLogger(ExampleControllerFeignClientFallbackFactory.class);
- @Override
- public ExampleControllerFeignClient create(Throwable cause) {
- return new ExampleControllerFeignClient() {
- @Override
- public String getInfoById(Long signingLogId) {
- logger.error("跨服务调用失败, 原因是:" + cause.getMessage());
- return "失败, 原因是:" + cause.getMessage();
- }
- };
- }
- }
- }
关键代码就是
- @FeignClient(name = "sb-alibaba-nacos", url = "http://127.0.0.1:8081/", fallbackFactory = ExampleControllerFeignClient.ExampleControllerFeignClientFallbackFactory.class)
-
name 就是被调用方的服务名称 (
这里如果你没有配置服务注册中心的化,其实可以随便写) -
url 就是被调用方的地址(
如果配置了服务注册中心, 可以不写!, 不过两个服务必须都注册!,这样才能找到!) - fallbackFactory 就是调用失败时指定的处理类
最后, 我们写个测试方法
- package com.mrcoder.sbfeign.controller;
- import com.mrcoder.sbfeign.feign.ExampleControllerFeignClient;
- import org.springframework.beans.factory.annotation.Autowired;
- import org.springframework.web.bind.annotation.*;
- @CrossOrigin
- @RestController
- public class TestController {
- @Autowired
- private ExampleControllerFeignClient exampleControllerFeignClient;
- @RequestMapping(value = "getInfoById", method = RequestMethod.GET)
- public String test(@RequestParam(value = "id") Long Id) {
- return exampleControllerFeignClient.getInfoById(Id);
- }
- }
开启两个服务sb-alibaba-nacos, sb-feign
而后访问sb-feign的测试方法
http://localhost:9999/getInfoById?id=22
出现
sb-alibaba-nacos return :22
跨服务调用成功~
到此这篇关于从零开始学springboot整合feign跨服务调用的文章就介绍到这了,更多相关springboot整合feign跨服务调用内容请搜索快网idc以前的文章或继续浏览下面的相关文章希望大家以后多多支持快网idc!
原文链接:https://blog.csdn.net/mrcoderstack/article/details/109443790