在我们使用QQ上传头像,注册用户账号时是不是都会遇到上传图像,并根据自己的要求对图像进行裁剪,这是怎么实现的呐?
本文主要介绍了Asp.net mvc实现上传头像加剪裁功能,分享给大家供大家参考。具体如下:
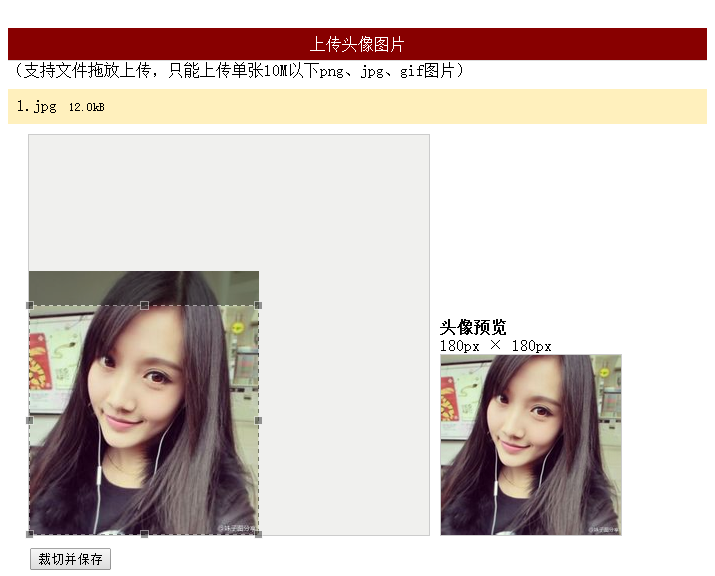
运行效果截图如下:
具体代码如下:
前台代码
?
|
1
2
3
4
5
6
7
8
9
10
11
12
13
14
15
16
17
18
19
20
21
22
23
24
25
26
27
28
29
30
31
32
33
34
|
<link href="~/Content/fineuploader.css" rel="stylesheet" />
<link href="~/Content/jquery.Jcrop.min.css" rel="stylesheet" />
<link href="~/Content/crop.min.css" rel="stylesheet" />
<script src="~/Scripts/jquery-1.8.2.min.js"></script>
<script src="~/Scripts/jquery.fineuploader-3.1.min.js"></script>
<script src="~/Scripts/jquery.Jcrop.min.js"></script>
<script src="~/Scripts/crop.js"></script>
<div id="jquery-wrapped-fine-uploader"></div>
<div id="message"></div>
<div id="crop_wrap">
<div id="crop_holder">
<div id="crop_area" class="border">
<img id="crop_image" alt="" src="" class="preview-image" style="display: none" />
</div>
<div id="preview_area">
<div id="preview_title">当前头像</div>
<div id="preview_large_text" class="preview-text">180px × 180px</div>
<div id="preview_large_wrap" class="border">
<img id="preview_large" alt="" src="@ViewBag.Path" class="preview-image" style=""/></div>
</div>
</div>
<div id="crop_operation" style="display: none;">
<form id="form_crop" action="/home/index" method="post">
<input type="hidden" name="x" id="x">
<input type="hidden" name="y" id="y">
<input type="hidden" name="w" id="w">
<input type="hidden" name="h" id="h">
<input type="hidden" name="imgsrc" id="imgsrc">
<input id="crop_operation_submit" type="submit" value="裁切并保存" /><span id="crop_operation_msg" style="display: none" class="green"></span>
</form>
</div>
<div id="croped_message" class="green"></div>
</div>
|
后台代码
?
|
1
2
3
4
5
6
7
8
9
10
11
12
13
14
15
16
17
18
19
20
21
22
23
24
25
26
27
28
29
30
31
32
33
34
35
36
37
38
39
40
41
42
43
44
45
46
47
48
49
50
51
52
53
54
55
56
57
58
59
60
|
public ActionResult Index()
{
return View();
}
/// <summary>
/// 保存缩略图
/// </summary>
/// <param name="form"></param>
/// <returns></returns>
[HttpPost]
public ActionResult Index(FormCollection form)
{
int x = Convert.ToInt32(form["x"]);
int y = Convert.ToInt32(form["y"]);
int w = Convert.ToInt32(form["w"]);
int h = Convert.ToInt32(form["h"]);
string imgsrc = form["imgsrc"].Substring(0, form["imgsrc"].LastIndexOf("?"));
string path = ImgHandler.CutAvatar(imgsrc, x, y, w, h);
//保存Path
ViewBag.Path = path;
return View();
}
/// <summary>
/// 上传头像
/// </summary>
/// <param name="qqfile"></param>
/// <returns></returns>
[HttpPost]
public ActionResult ProcessUpload(string qqfile)
{
try
{
string uploadFolder = "/Upload/original/" + DateTime.Now.ToString("yyyyMM") + "/";
string imgName = DateTime.Now.ToString("ddHHmmssff");
string imgType = qqfile.Substring(qqfile.LastIndexOf("."));
string uploadPath = "";
uploadPath = Server.MapPath(uploadFolder);
if (!Directory.Exists(uploadPath))
{
Directory.CreateDirectory(uploadPath);
}
using (var inputStream = Request.InputStream)
{
using (var flieStream = new FileStream(uploadPath + imgName + imgType, FileMode.Create))
{
inputStream.CopyTo(flieStream);
}
}
return Json(new { success = true, message = uploadFolder + imgName + imgType });
}
catch (Exception e)
{
return Json(new { fail = true, message = e.Message });
}
}
|
以上就是实现Asp.net mvc上传头像加剪裁功能的部分代码,小编分享给大家参考,希望对大家的学习有所帮助。

相关文章


猜你喜欢
- ASP.NET自助建站系统的数据库备份与恢复操作指南 2025-06-10
- 个人网站服务器域名解析设置指南:从购买到绑定全流程 2025-06-10
- 个人网站搭建:如何挑选具有弹性扩展能力的服务器? 2025-06-10
- 个人服务器网站搭建:如何选择适合自己的建站程序或框架? 2025-06-10
- 64M VPS建站:能否支持高流量网站运行? 2025-06-10